Feature Entry Points and Operation Paths
Find an entry by task. Use the Conversation Interface to send tasks and view results, the Resource Manager to manage agents and skills, and Applications and Services to install apps and connect services.
| What You Want to Do | Where to Start | Shortest Path |
|---|---|---|
| Start a conversation with an agent | Conversation Interface | Select an agent on the left → Enter a task at the bottom → View the reply |
| Find a historical conversation | Conversation Interface | Use the left-side list or search box → Click the conversation |
| Switch files, terminals, or web pages | Workspace tabs | Open the right workspace → Select a resource tab; see Interface Layout |
| Review document edits | Document content area | Expand the pending review count → Accept or reject changes; see Review Changes |
| Use a quick command | Conversation Interface | Type / in the input box → Select a command → Send |
| Manage agents | Resource Manager | Click the “folder” icon on the left → Agents |
| Import or configure skills | Resource Manager | Click the “folder” icon on the left → Skills → Import or configure |
| View automation tasks | Resource Manager | Click the “folder” icon on the left → Automation |
| Install an application | Applications and Services | Click the four-square icon on the left → Applications → Install |
| Connect an external service | Applications and Services | Click the four-square icon on the left → Services → Select an HTTP / MCP service |
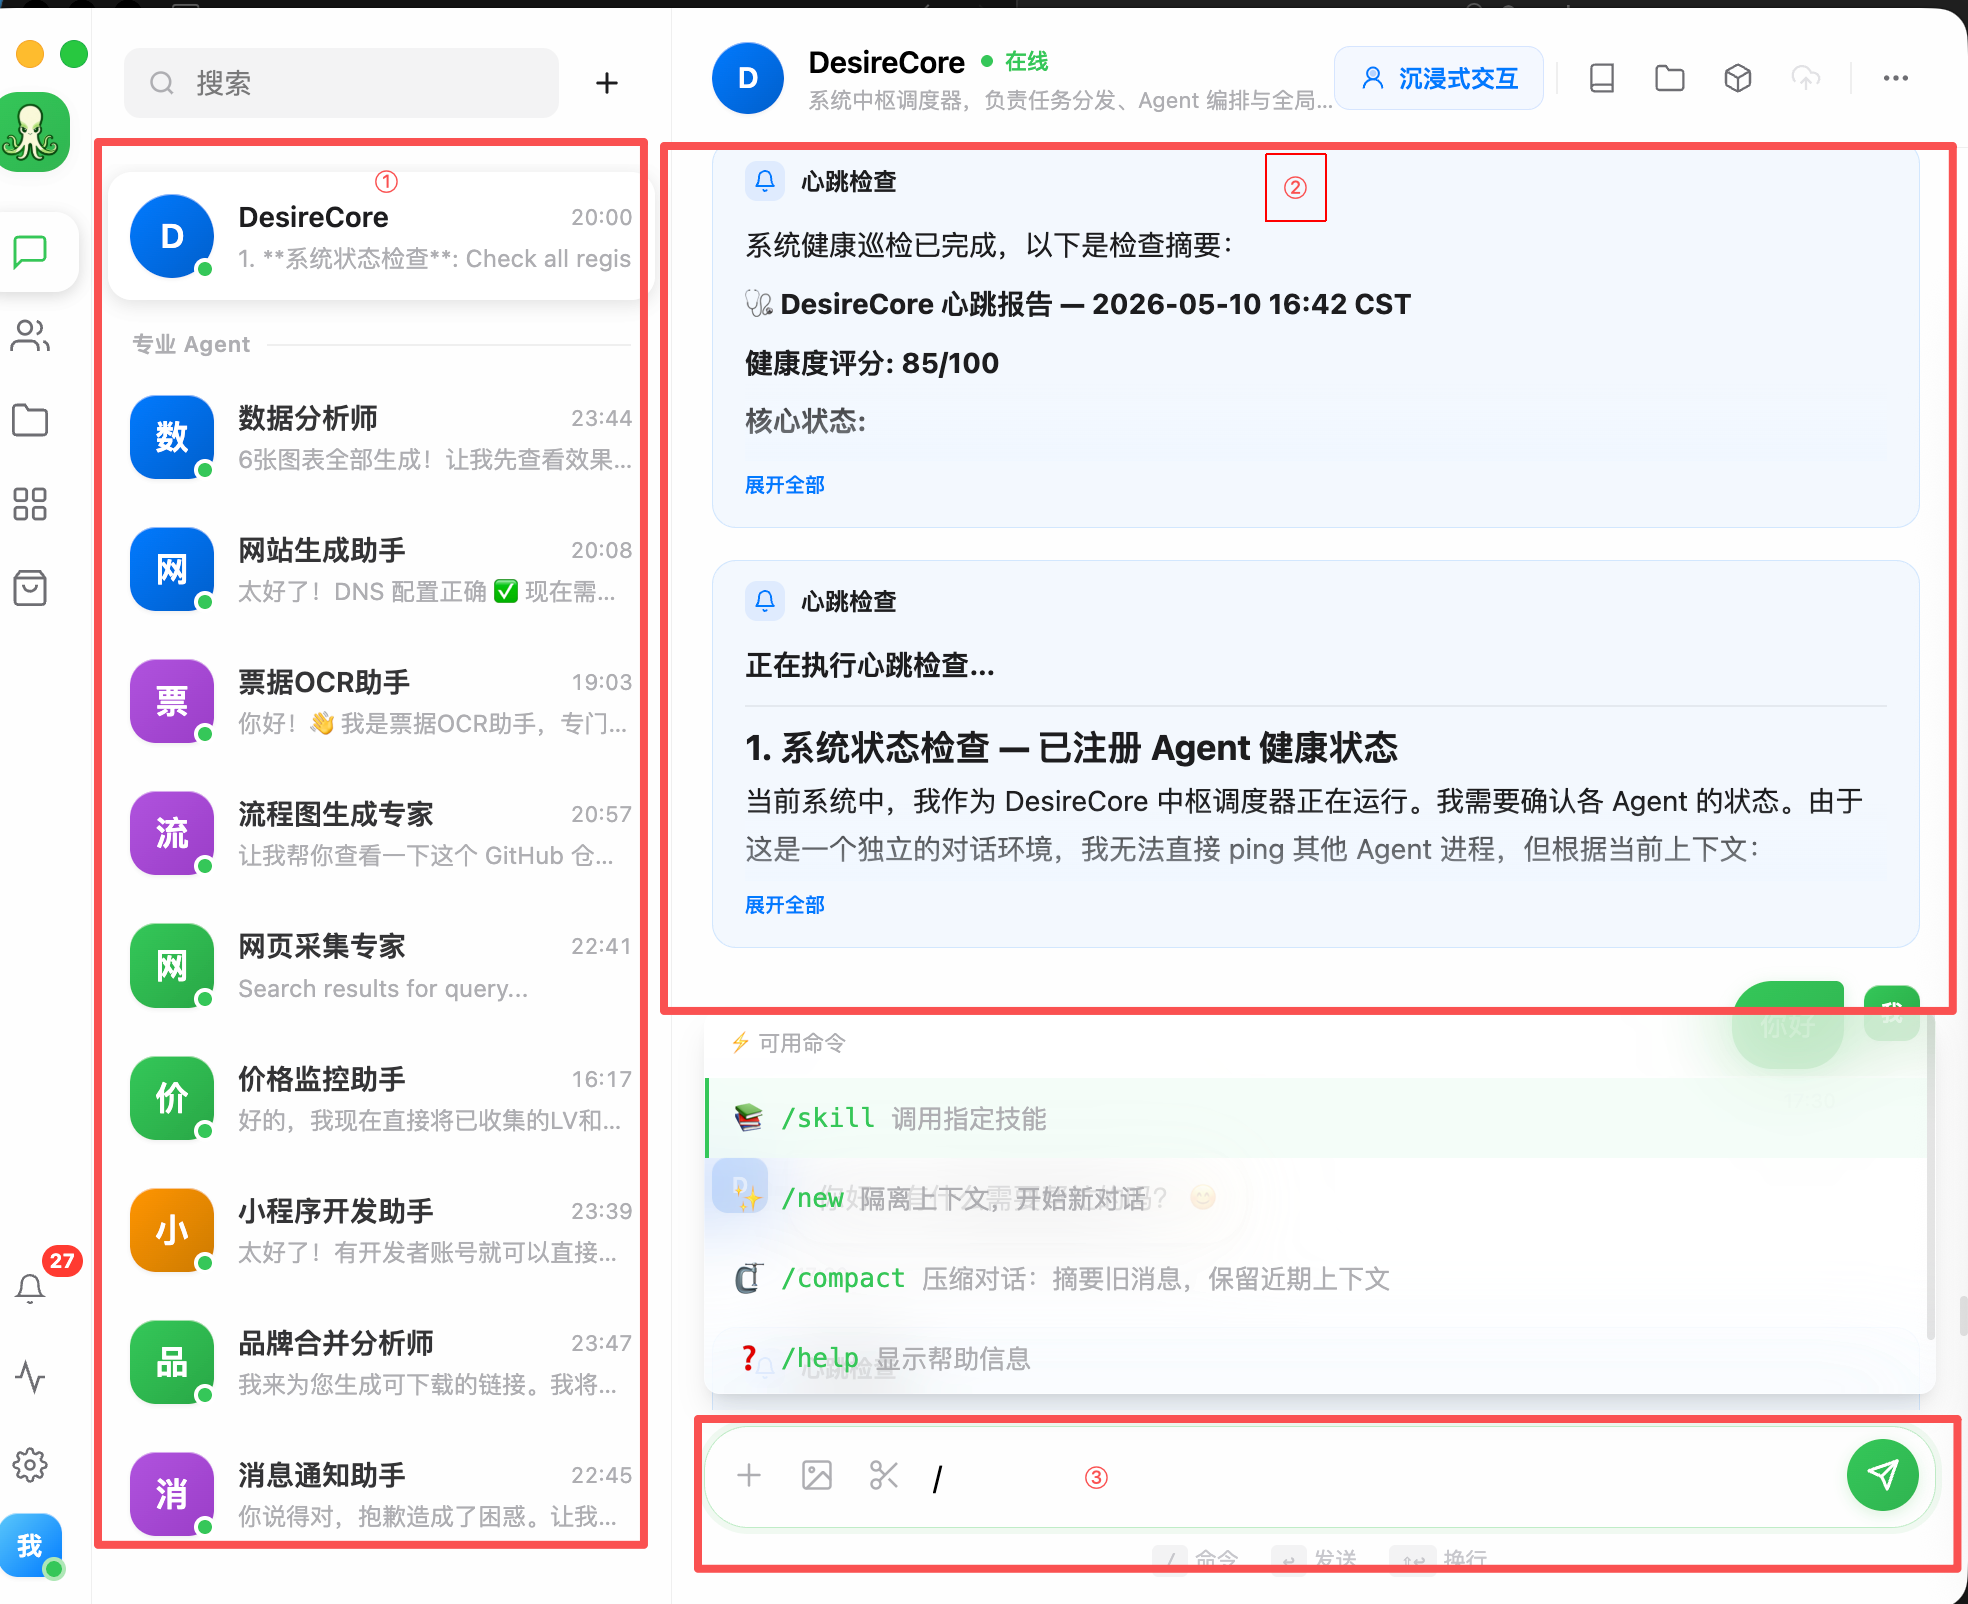
1. Three Areas of the Conversation Interface
The areas marked ①, ②, and ③ let you select an agent, view results, and send messages.
| No. | Area | Purpose |
|---|---|---|
| ① | Agent and Conversation List | Choose the agent you want to talk to, and view conversation history and recent messages |
| ② | Chat History Area | View agent replies, task execution progress, reports, and expanded content |
| ③ | Input and Command Area | Enter messages, send tasks, upload attachments, or use slash commands |
Select an agent and send a message from the input area. Replies and execution notices appear in the chat history area.
① Agent and Conversation List
The left-side list is used to choose different agents or historical conversations. Each row represents an agent or a conversation entry.
| Element | Description |
|---|---|
| Search box | Enter keywords to find agents or conversation history |
| Plus button | Create a new conversation or add a new entry |
| Agent avatar | Uses color and text to distinguish different agents |
| Agent name | Shows available professional agents, such as DesireCore, Data Analyst, or Website Generator |
| Green status dot | Shows an Agent status hint; use replies and execution receipts to check task completion |
| Recent message | Shows the latest reply or task summary from that agent |
| Time | Shows the most recent conversation or update time |
How to use:
- Find the agent you want to use in the left-side list.
- Click the agent name or conversation card.
- The right side switches to the corresponding chat page.
- If the list is long, use the search box at the top to find an agent quickly.
In manual multi-session mode, click New Session on a Project row or select a project with the project picker. See Managing Conversations for saving, archiving, and directory settings.
Examples:
| What You Want to Do | Suggested Agent |
|---|---|
| Let the system assign tasks or coordinate multiple agents | DesireCore |
| Analyze tables, generate charts, or create reports | Data Analyst |
| Generate a website or page | Website Generator |
| Recognize invoice or receipt images | Receipt OCR Assistant |
| Extract content from webpages | Web Scraping Specialist |
| Send reminders or notifications | Notification Assistant |
② Chat History Area
The upper-right area is the chat history area. It displays the agent's replies, task progress, and result reports.
| Element | Description |
|---|---|
| Message card | Displays replies, reminders, reports, or task results returned by the agent |
| Title | Shows the topic of the current reply, such as “Heartbeat Check” |
| Summary content | Shows key conclusions, scores, status, or explanations |
| Expand all | Expands collapsed content when the card provides this button |
| History | Keeps previous conversations and execution progress in chronological order |
Check the task name, result, and error notices in the reply. If the card provides Expand all, click it to read collapsed content.
Common result types:
| Type | Description |
|---|---|
| Normal reply | A direct answer from the agent |
| Execution progress | Shows that a task is being processed, checked, or generated |
| Result report | Shows analysis reports, check results, tables, or summaries |
| Error prompt | Explains the reason when a task fails or when more information is needed |
| Operation receipt | Indicates whether the task is complete, waiting for confirmation, or needs further action |
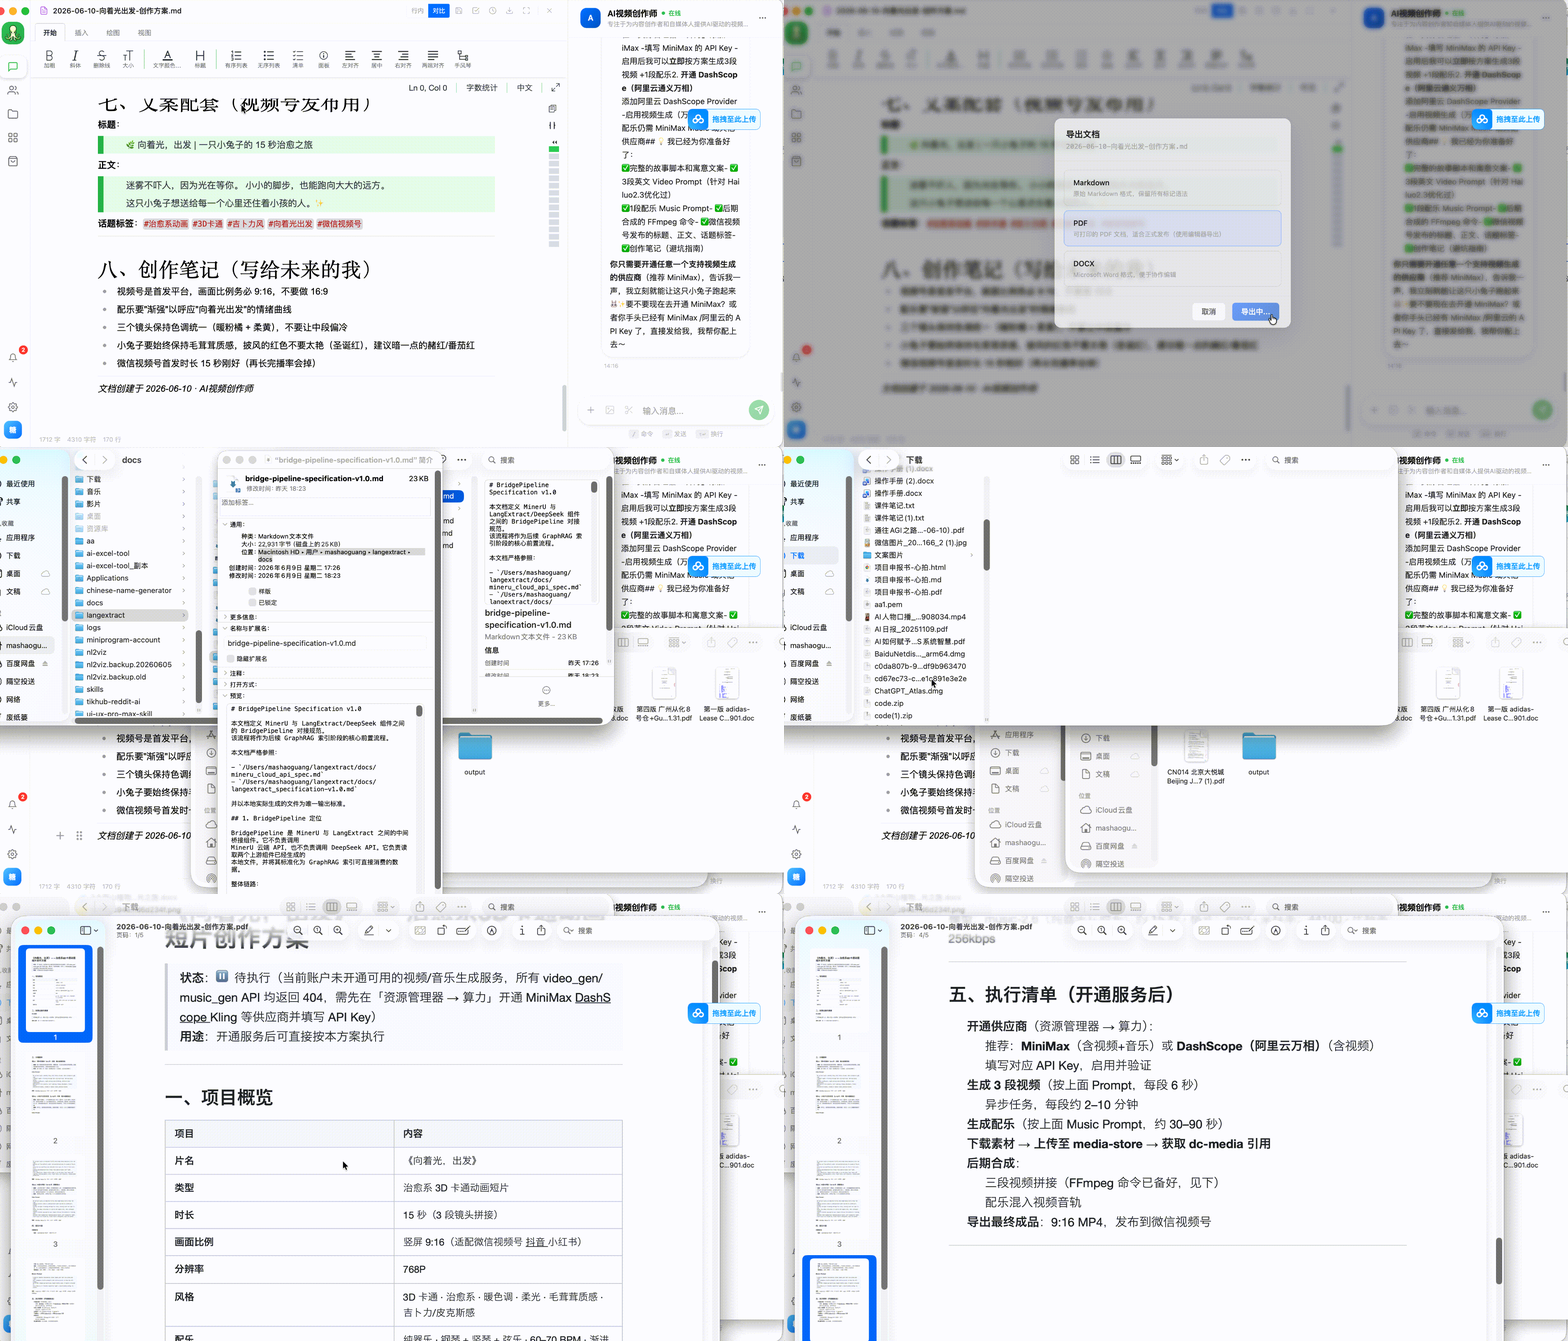
Exporting created documents:
After an agent finishes creating a document, organizing a report, or generating content, you can use the export entry in the result card to save the document in different formats for later editing, sharing, or archiving.
| Export Format | Best For |
|---|---|
| Markdown | Continuing maintenance in a documentation system, knowledge base, or code repository |
| Formal sharing, archiving, or sending to external readers | |
| Word | Further editing, commenting, or collaborative revision |
The animation below shows how to choose an export format from the result card and save the file after a document has been created.
Reading tips:
- Check the title first to confirm which task the message belongs to.
- Read the summary to quickly judge whether the result is normal.
- If the card provides Expand all, click it to read collapsed content.
- If the agent asks for more information, continue replying in the input area at the bottom.
③ Input and Command Area
The bottom area is used to send messages, upload content, or call quick commands.
| Icon / Element | Description |
|---|---|
| Plus button | Add attachments or open more input tools |
| Image icon | Upload images for the agent to recognize or process |
| Scissors icon | Take a screenshot, crop, or capture content |
| Input box | Enter questions, task requirements, or additional instructions |
| Paper plane button | Send the current message |
/ command | Enter a slash to display the available command list |
In the screenshot, / is entered in the input box, so the system displays the available command list. Common commands include:
| Command | Purpose |
|---|---|
/skill | Call a specified skill |
/new | Start a fresh conversation — previous chats won't affect this one |
/compact | Trim the chat history, keep important info, and free up space |
/steer | Add mid-task guidance or constraints for the agent to use in its next round of reasoning and actions |
/help | Show help information |
Basic operation steps:
- Enter your question or task in the input box.
- If you need to upload an image, click the image icon.
- If you need to use a command, type
/first and then choose the command. - Click the paper plane button on the right to send.
- Wait for the agent to return the result in area ②.
Examples:
Check whether this report is missing any key points.
Convert this receipt image into a table.
/help
2. Beginner Example
If you want to start a conversation with an agent, follow these steps:
- Choose an agent in area ①, such as DesireCore or Data Analyst.
- Enter your question or task in area ③.
- Click the paper plane button to send the message.
- View the agent's reply, task progress, or generated result in area ②.
- If the result is incomplete, continue adding requirements in area ③.
Key Reminder
For first-time use, remember these three positions:
| Position | Purpose |
|---|---|
| ① | Choose an agent or historical conversation |
| ② | View replies, task results, and reports |
| ③ | Send messages, upload files, and use commands |
Once you understand these three areas, you can complete most basic conversations and task operations.
After completing a basic conversation, use these signs to check whether the operation succeeded:
| Success Sign | Description |
|---|---|
| A new message card appears on the right | The message has been sent and entered the processing flow |
| The message card contains a summary, result, or receipt | The agent has returned a readable result |
| You can continue asking or adding requirements | The current conversation can continue |
| If more information is needed, the system asks you to provide it | The task has not failed; it only needs more input |
3. Resource Manager
The Resource Manager is used to centrally view and manage different types of resources in DesireCore, including agents, skills, automation tasks, workflows, compute services, email accounts, storage, and code repositories.
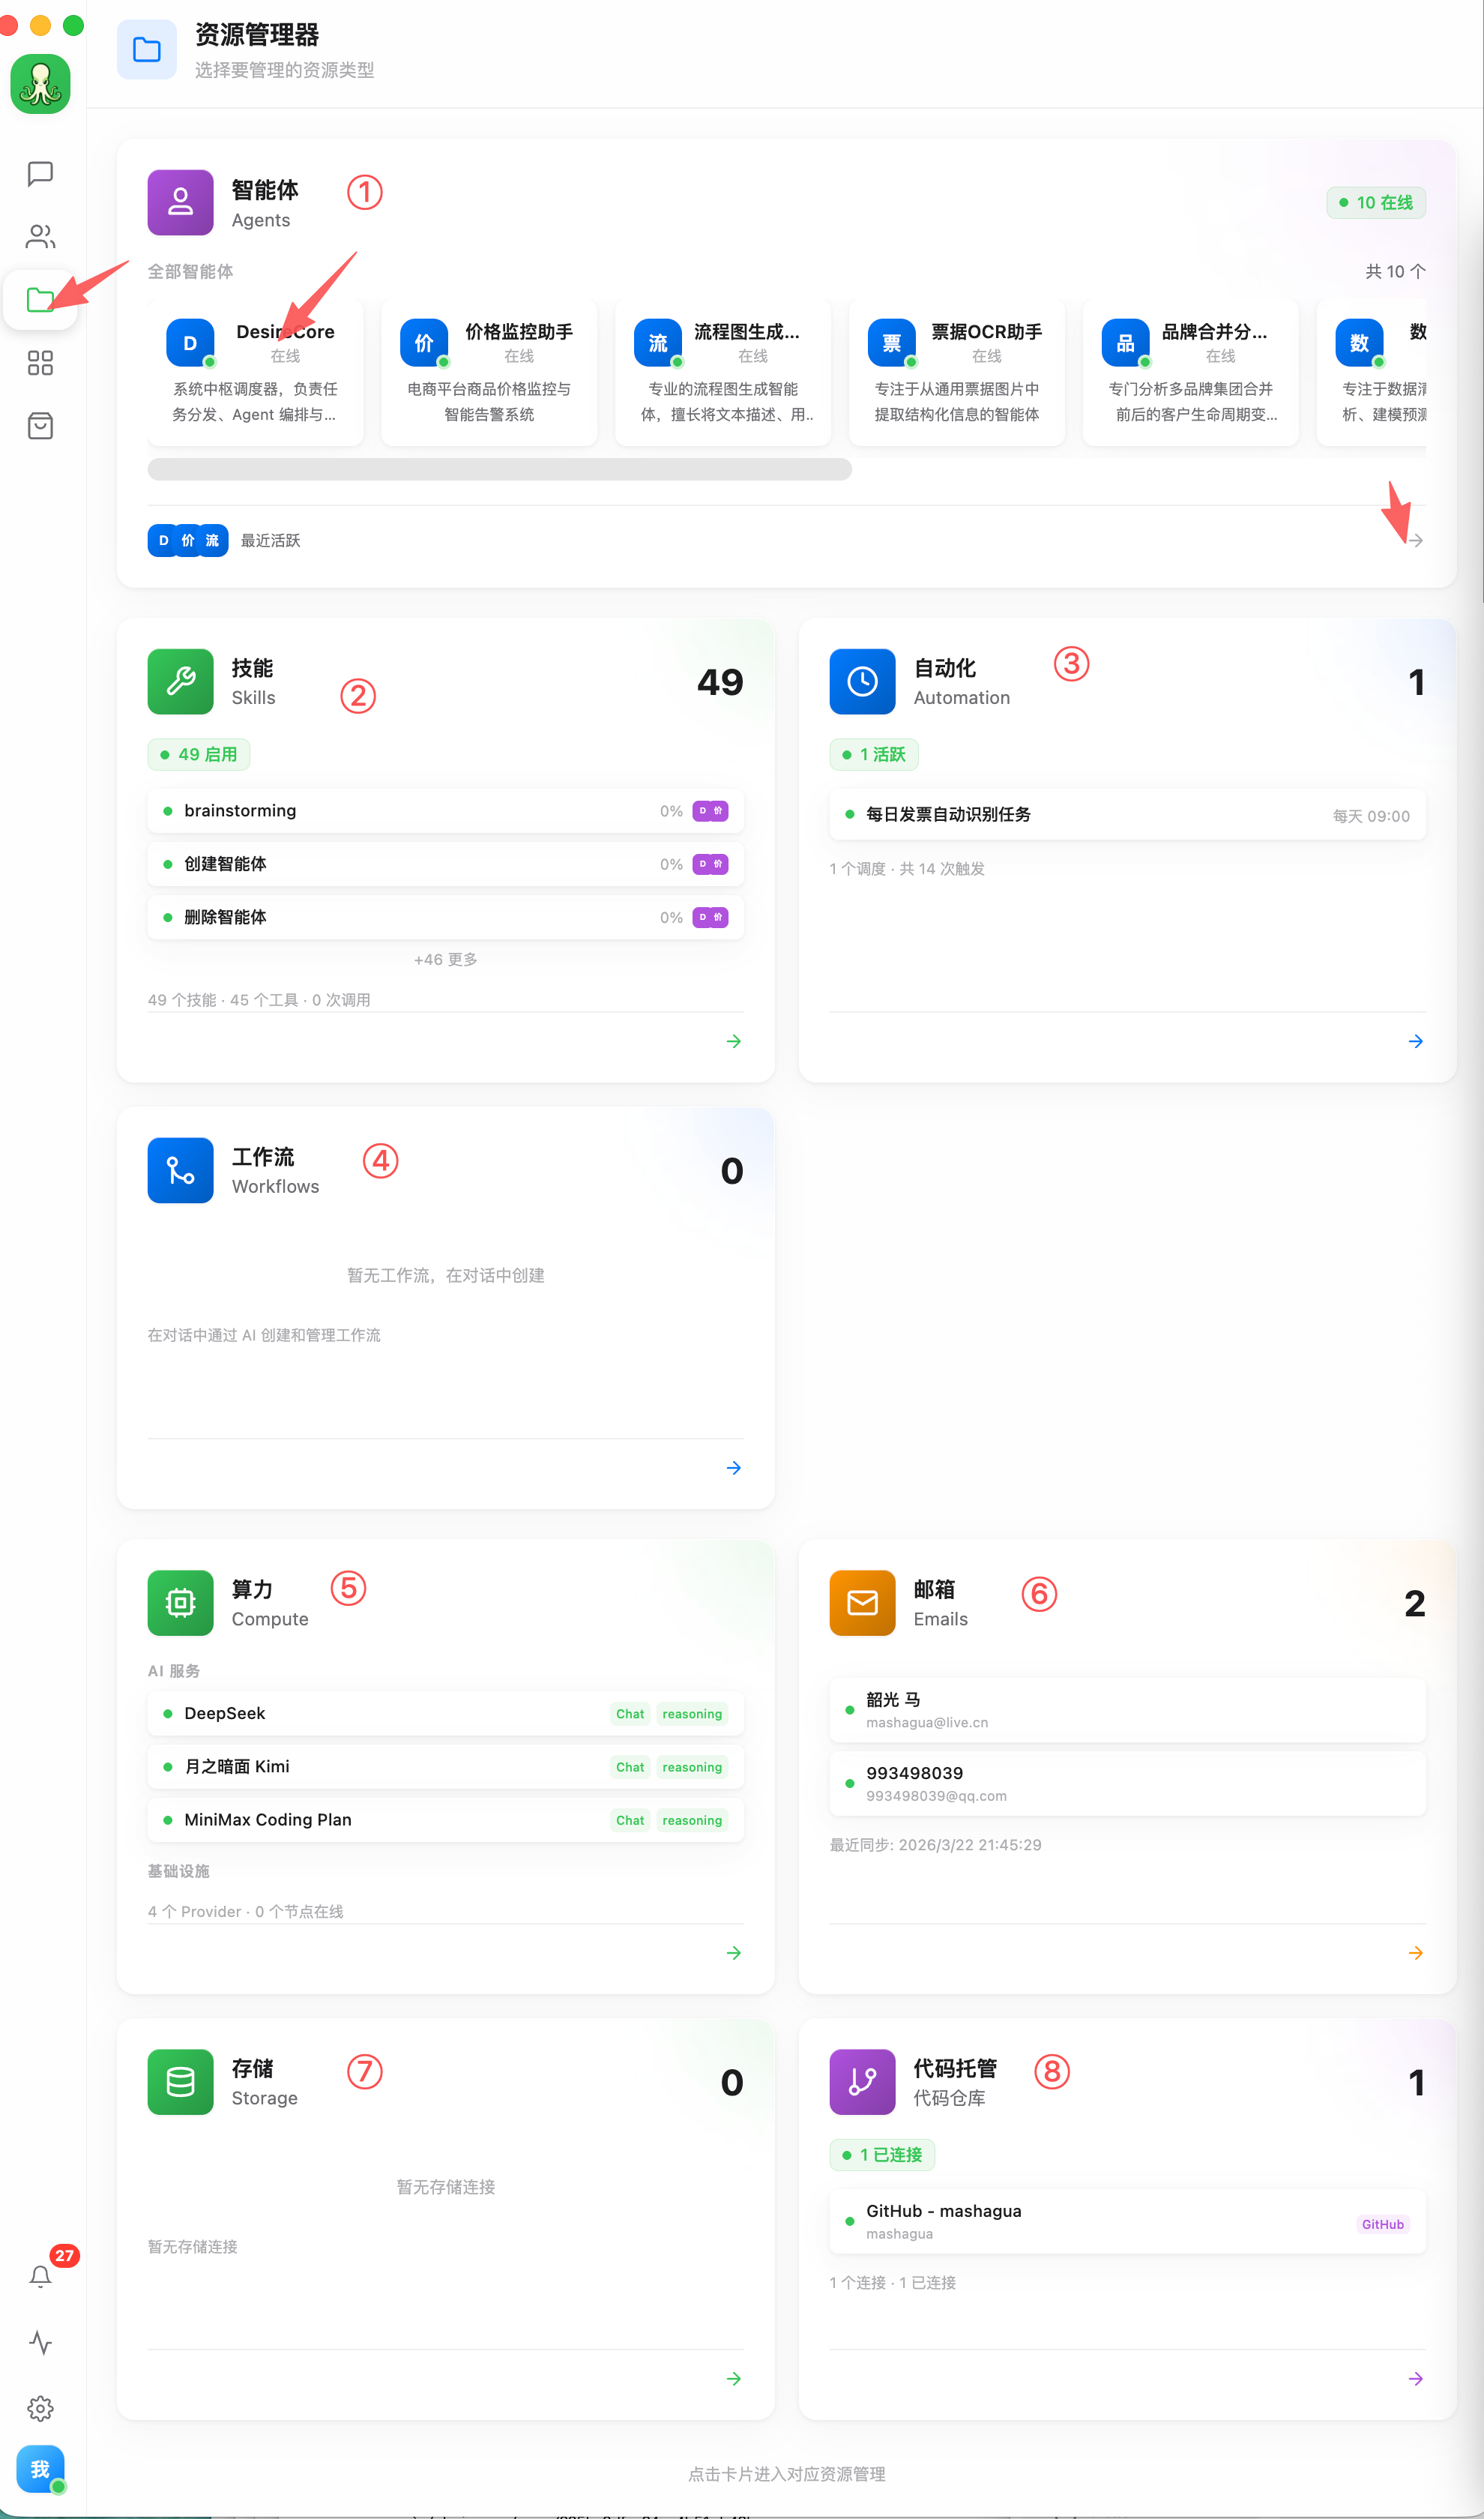
Click the “folder” icon in the left navigation bar to enter the Resource Manager page.
You can understand the difference between Resource Manager and Applications and Services like this:
| Module | Main Purpose | When to Use It |
|---|---|---|
| Resource Manager | Manage resources that already exist in the system | View, configure, enable, or assign agents, skills, automation tasks, workflows, and more |
| Applications and Services | Add new applications or connect external services | Install apps, connect APIs, or integrate MCP / HTTP services |
The numbers 1 to 8 in the Resource Manager page represent the following functions:
| No. | Function | Purpose |
|---|---|---|
| ① | Agents | View and manage agents in the current system, including online status, recently active agents, and total agent count |
| ② | Skills | View enabled skills and tool capabilities, such as creating agents, deleting agents, and brainstorming |
| ③ | Automation | View and manage scheduled tasks, recurring tasks, and automatically triggered tasks |
| ④ | Workflows | View and manage workflows that combine multiple steps into reusable processes |
| ⑤ | Compute | View available AI services, model services, or compute resources |
| ⑥ | Emails | View connected email accounts for email synchronization, sending, or related automation tasks |
| ⑦ | Storage | View and manage storage connections for file saving, reading, or external storage integration |
| ⑧ | Code Hosting / Repositories | View connected code repositories, such as GitHub repositories, for code-related tasks |
① Agents
The “Agents” card shows the agents available in the current system. Users can view the number of agents, their online status, and recently active agents.
Suitable scenarios:
| Scenario | Description |
|---|---|
| Find a professional assistant | See which agents are currently available |
| Check availability | Read the status hint; after sending a task, check its execution state and receipt |
| Enter agent management | Click the card or arrow to open the detailed agent list |
② Skills
The “Skills” card shows the capabilities enabled in the system. A skill can be understood as a tool or operation capability that agents can call.
Common skills include:
| Skill Type | Purpose |
|---|---|
| Create agent | Create a new professional agent based on requirements |
| Delete agent | Delete agents that are no longer needed |
| Brainstorming | Help generate ideas, options, or plans |
| File and data processing | Help read, organize, or generate file content |
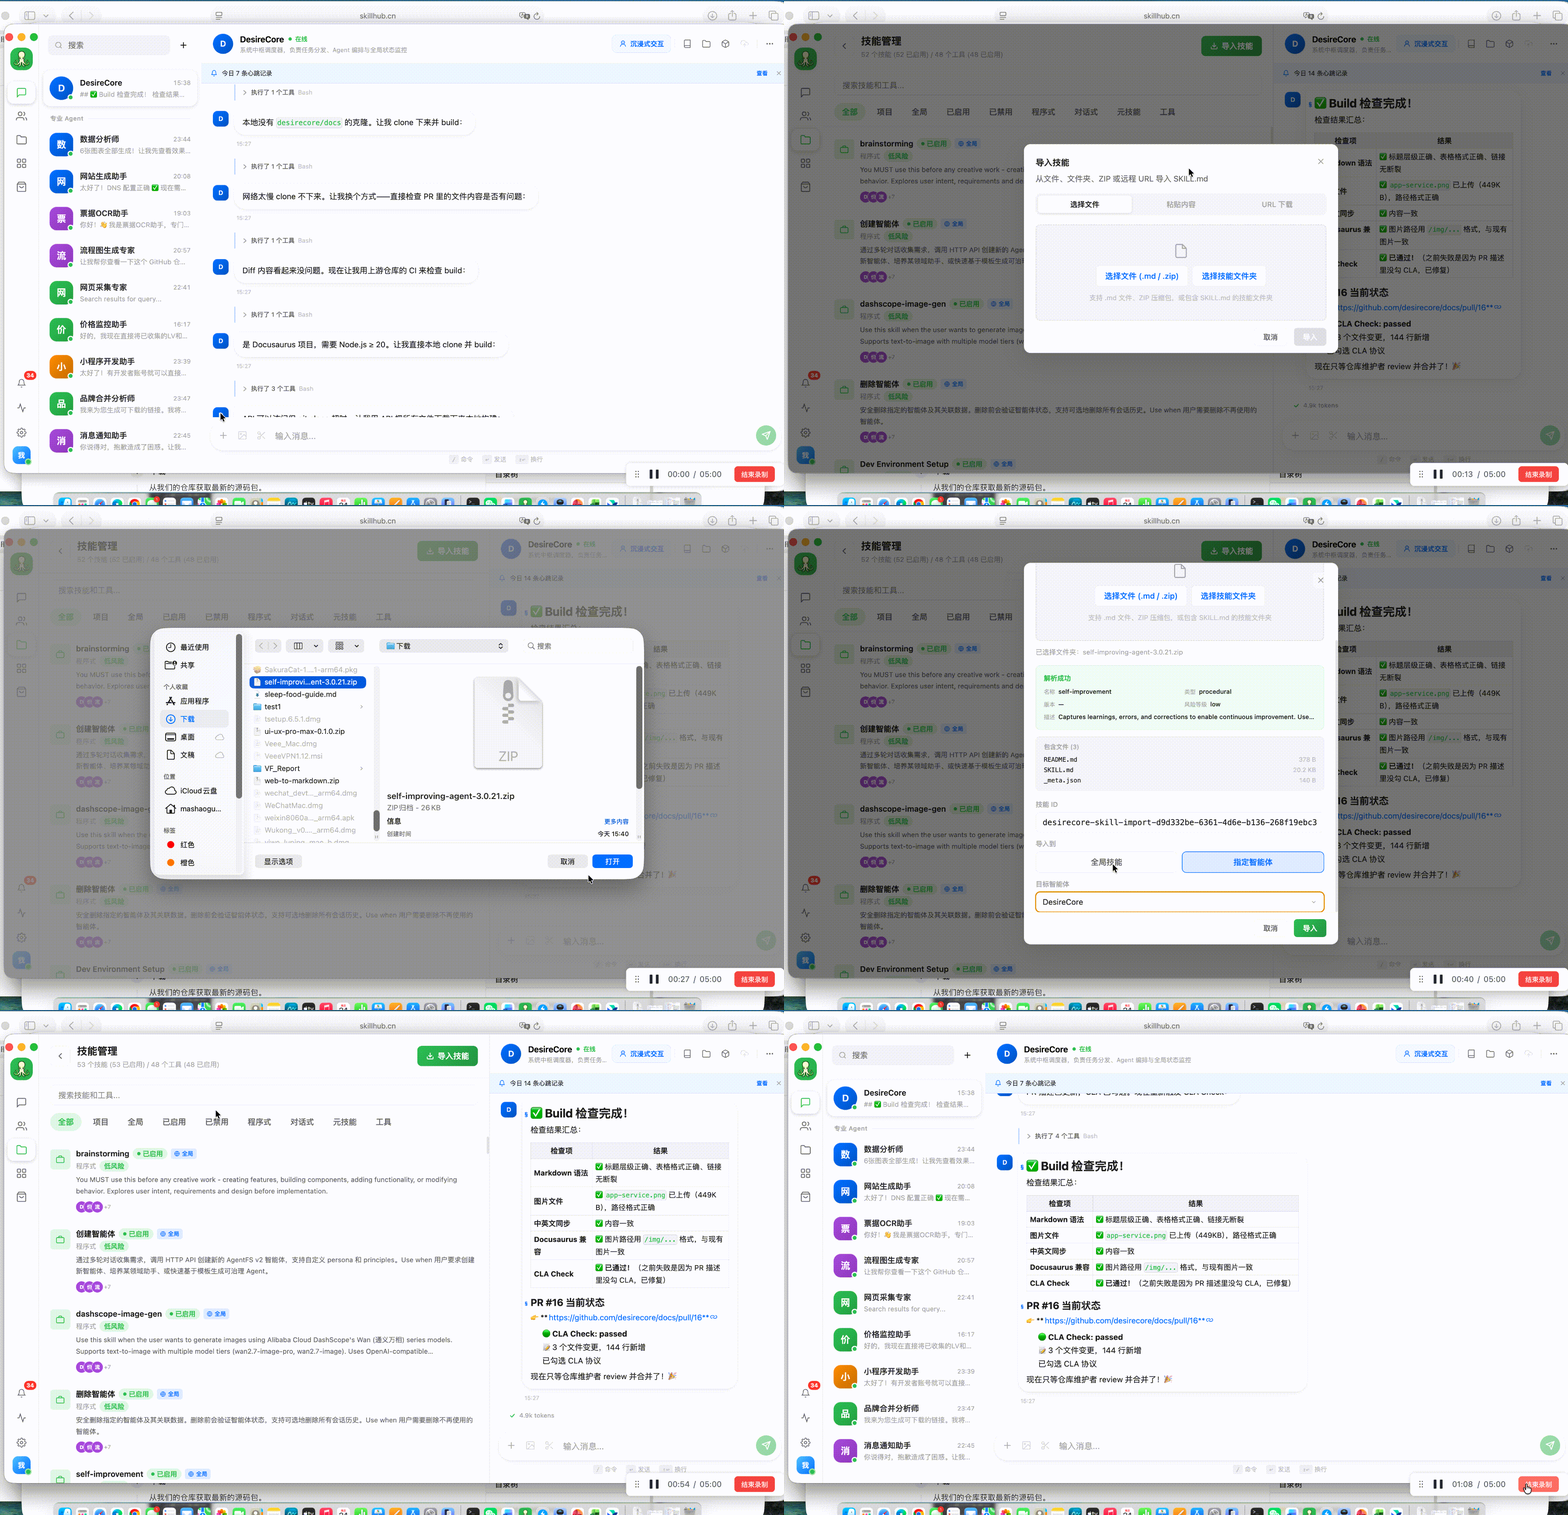
Common ways to import skills:
| Import Method | How to Use It |
|---|---|
| Import from local file | Click the import entry on the Skills page, select a local skill file, and confirm the import |
| Import from link | Paste the access link for a skill package or skill configuration, and the system will read it and complete the import |
| Import from resource library | Search for or select an existing skill in the skill resource library, then click Add or Import |
| Import in a conversation | Describe the skill you want to import in a conversation, and the agent can assist based on your instruction |
After importing, you can view the new skill in the skill list, then enable, configure, or assign it to the corresponding agent as needed.
To confirm that a skill was imported successfully, check the following:
| Success Sign | Description |
|---|---|
| The new skill appears in the skill list | The skill has entered the system |
| The skill status shows available or enabled | The skill can be called |
The skill can be found through /skill in a conversation | The skill is in the callable range |
| The skill can be assigned to a specific agent | The skill can participate in future task execution |
The animation below shows the process of entering the import entry from the Skills page, choosing an import method, and completing the import.
③ Automation
The “Automation” card is used to view scheduled or recurring tasks. In the screenshot, there is a “Daily invoice auto-recognition task”, which means the system will run it automatically at the specified time.
Suitable scenarios:
| Scenario | Example |
|---|---|
| Scheduled reminder | Remind me to attend a meeting every day at 9:00 AM |
| Recurring execution | Automatically recognize invoices every day |
| Regular check | Check system status or data changes at regular intervals |
④ Workflows
“Workflows” combine multiple steps into a repeatable process. They are suitable for fixed procedures, multi-step tasks, or tasks that require multiple agents to collaborate.
Example:
Collect webpage materials → Organize the table → Generate a report → Send an email
If there is no workflow yet, the page displays that no workflow is available. Later, you can create and manage workflows through AI in a conversation.
⑤ Compute
The “Compute” card shows the currently available AI services or model resources, such as DeepSeek, Kimi, and MiniMax Coding Plan.
Users usually do not need to configure compute manually. You only need to enter this area when switching models, adjusting capability sources, or checking service status.
⑥ Emails
The “Emails” card shows connected email accounts. After an email account is connected, the system can work with agents to complete email-related tasks.
Suitable scenarios:
| Scenario | Description |
|---|---|
| Email notification | Send task results or reminders by email |
| Email synchronization | Read or synchronize content from a specified mailbox |
| Email automation | Process emails regularly together with automation tasks |
⑦ Storage
The “Storage” card is used to manage file storage connections. If external storage is connected, the system can read, save, or synchronize related files.
Suitable scenarios:
| Scenario | Description |
|---|---|
| Save task results | Save reports, tables, or images to a specified location |
| Read materials | Read files from storage for agents to process |
| Connect external space | Integrate cloud storage or other file systems |
⑧ Code Hosting
The “Code Hosting” card shows connected code repositories, such as GitHub. Once connected, agents can help process code, repository files, and development tasks.
Suitable scenarios:
| Scenario | Description |
|---|---|
| Check repository connection | Confirm whether GitHub or other code platforms are connected |
| Handle code tasks | Let agents read, analyze, or modify code |
| Project collaboration | Use it together with website generation, automation, or workflow tasks |
For beginners, focus first on three Resource Manager entries: Agents, Skills, and Automation. Agents determine “who does the work”, Skills determine “what can be done”, and Automation determines “when it runs”.
4. Applications and Services
The Applications and Services page is a separate module for browsing installable applications and connectable services. It divides common capabilities into two groups: applications you can install and use directly, and external services you can connect to the system.
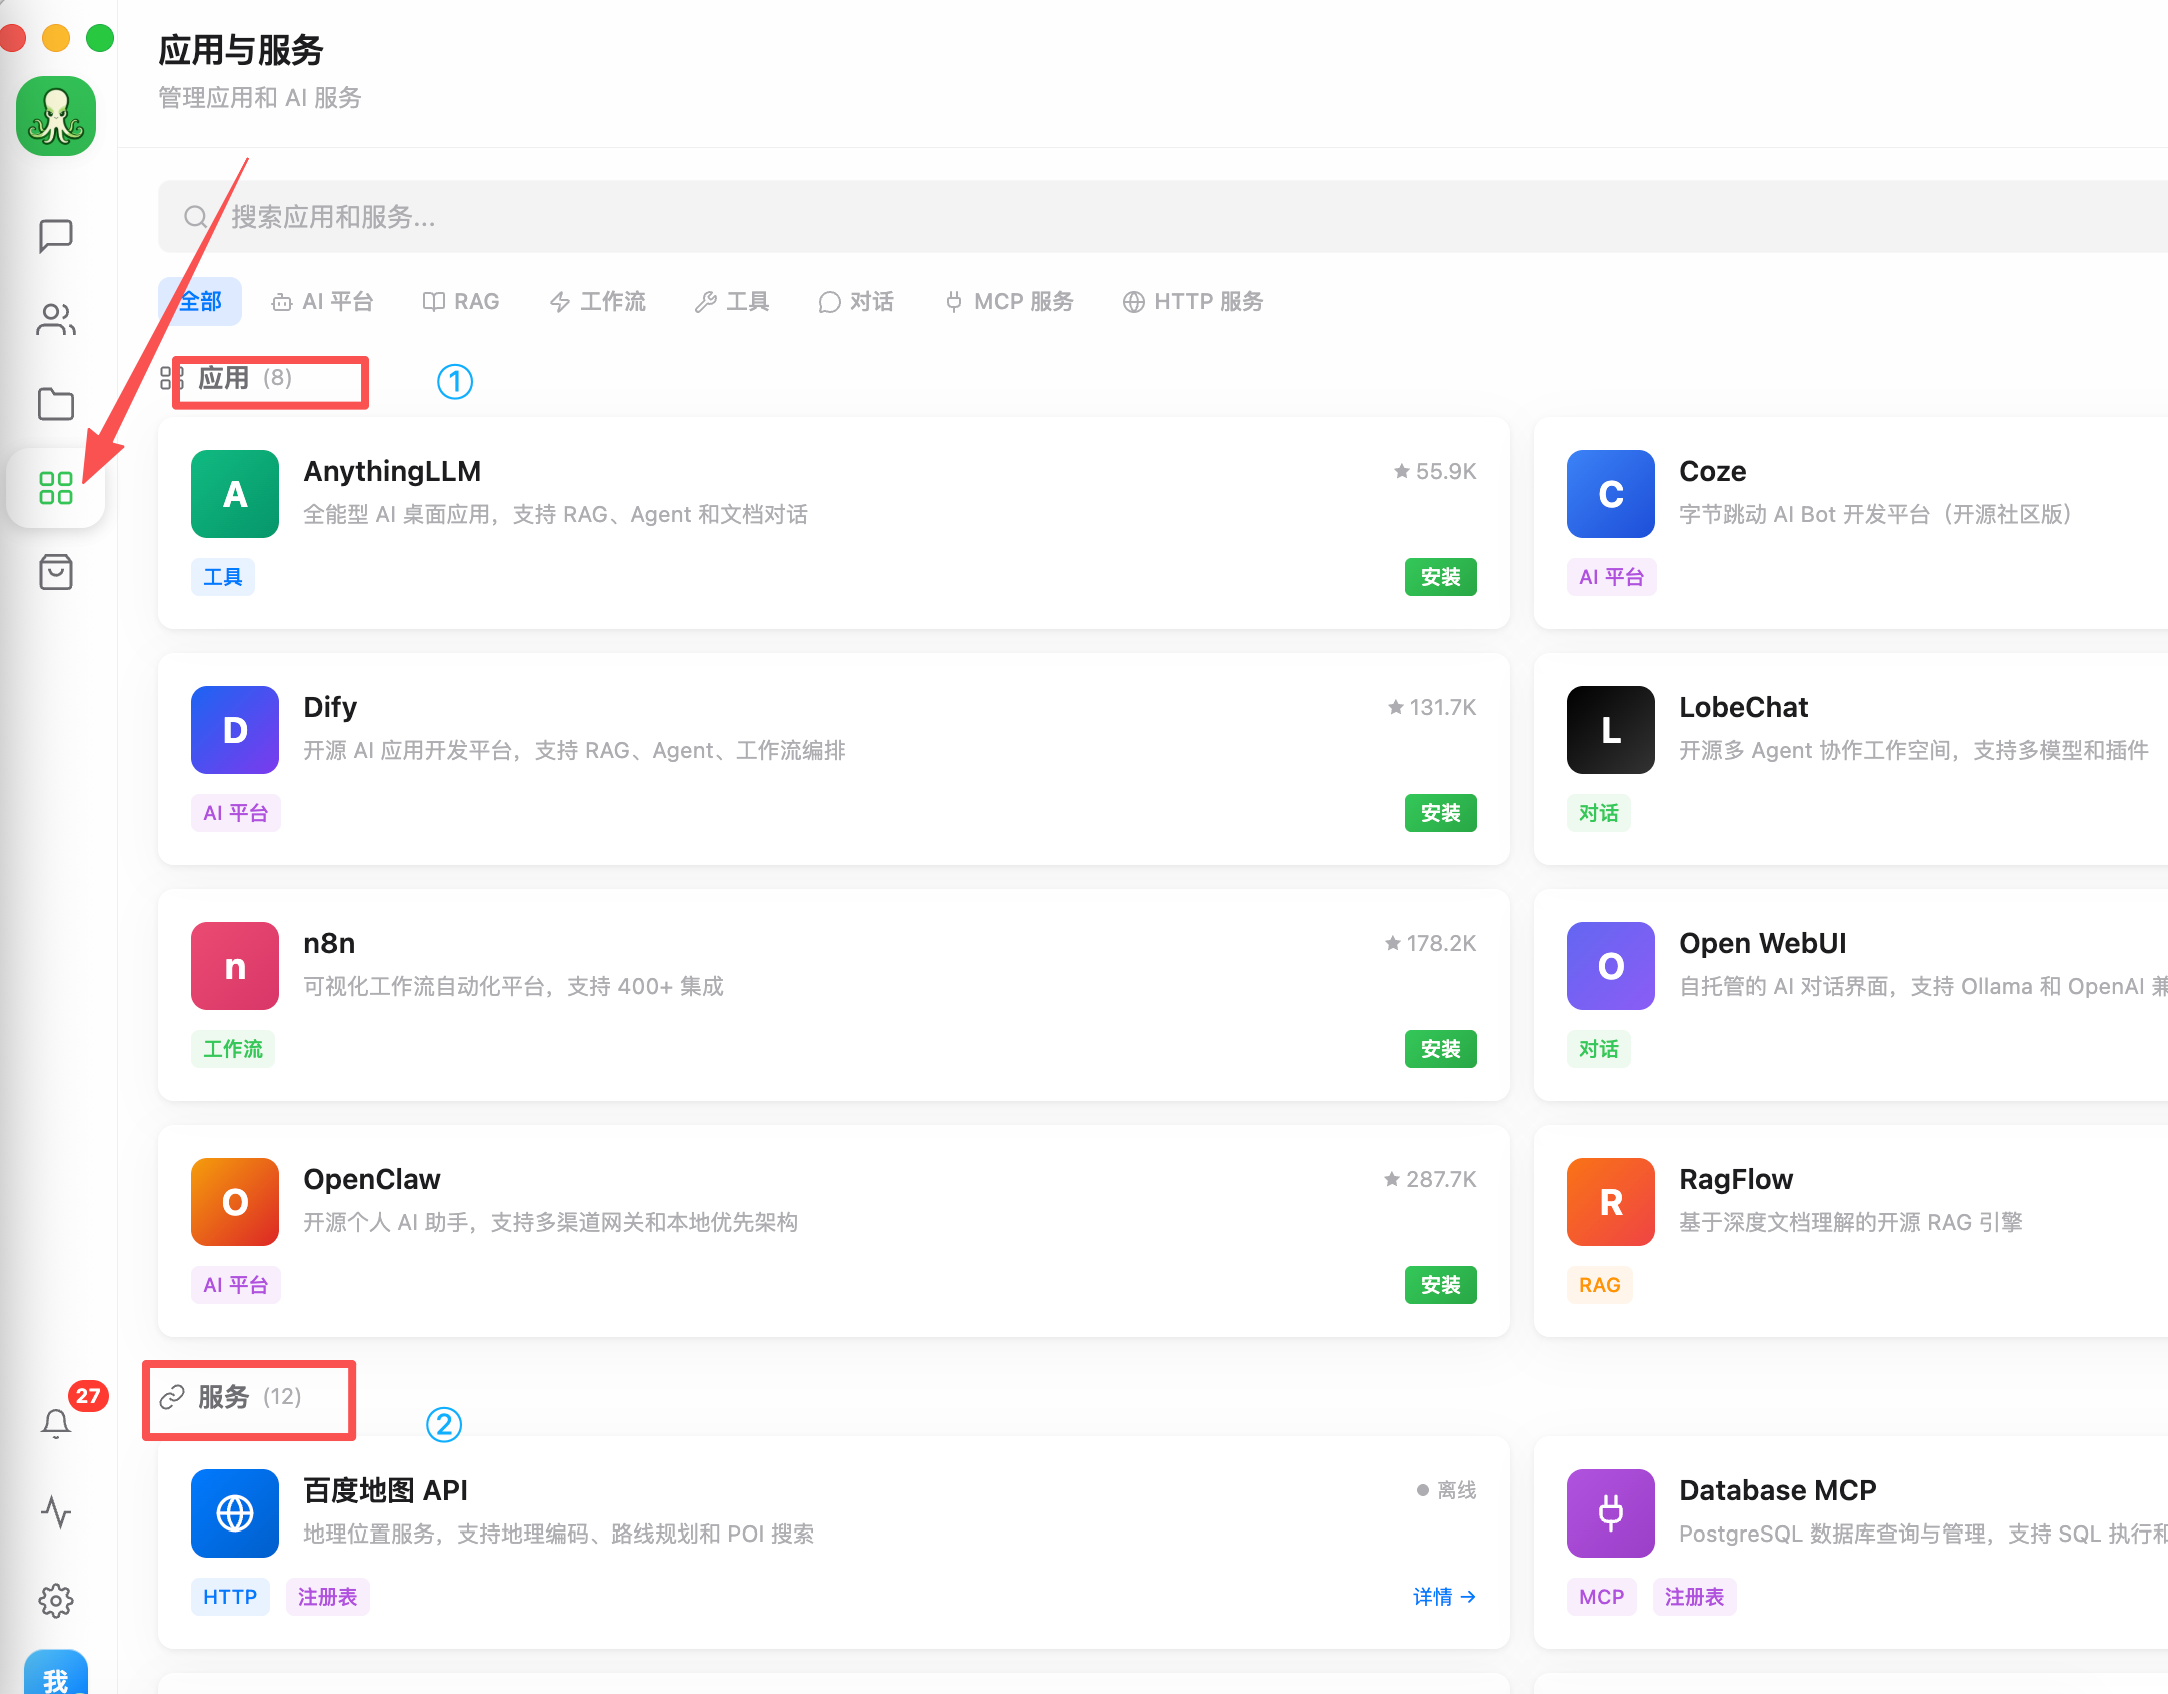
How to open it:
- Click the four-square icon in the left navigation bar.
- Enter the Applications and Services page.
- Use the category tabs or search box to find the target app or service.
The page has two key areas:
| No. | Area | Purpose |
|---|---|---|
| ① | Applications | Shows installable or usable apps, such as AnythingLLM, Coze, Dify, LobeChat, and n8n |
| ② | Services | Shows connectable services, such as map APIs, database MCP services, and HTTP services |
Category tabs at the top let you quickly filter resource types:
| Tab | Meaning |
|---|---|
| All | View all applications and services |
| AI Platforms | Show only AI platform apps |
| RAG | Show only knowledge retrieval related apps |
| Workflows | Show only workflow apps |
| Tools | Show only tool apps |
| Chat | Show only chat apps |
| MCP Services | Show only MCP-connected services |
| HTTP Services | Show only HTTP-connected services |
When choosing an application or service, start with this decision table:
| Need | Check First |
|---|---|
| Use a complete ready-made tool | Applications |
| Give agents access to external capabilities | Services |
| Build a knowledge base, RAG flow, or workflow | AI Platforms, RAG, or Workflows under Applications |
| Connect maps, databases, HTTP APIs, or MCP tools | HTTP Services or MCP Services under Services |
1. Applications
The application area shows ready-to-use products. Each card usually includes the name, short description, category tags, and an install button.
Common examples:
| App | Description |
|---|---|
| AnythingLLM | A full-featured AI desktop app with RAG, agents, and document chat |
| Coze | ByteDance AI bot development platform |
| Dify | Open-source AI app platform with RAG, agents, and workflow orchestration |
| LobeChat | Open-source multi-agent collaboration workspace |
| n8n | Visual workflow automation platform |
| Open WebUI | Self-hosted AI chat interface |
| OpenClaw | Open-source personal AI assistant with multi-channel gateway and local-first architecture |
| RagFlow | Open-source RAG engine based on deep document understanding |
Usage tips:
| Scenario | Description |
|---|---|
| Try a ready-made tool quickly | Open the application card and install it |
| Identify the app type | Check the tags, such as AI Platform, Tool, Chat, Workflow, or RAG |
| Compare alternatives | Use search and category filters to compare apps |
2. Services
The service area shows external capabilities that can be connected to the system, such as map APIs, database services, MCP services, or HTTP services.
Common examples:
| Service | Description |
|---|---|
| Baidu Maps API | Provides geolocation, route planning, and POI search |
| Database MCP | Provides PostgreSQL query and management capabilities |
Common service labels:
| Label | Meaning |
|---|---|
| HTTP | Service connected through HTTP |
| MCP | Service connected through the MCP protocol |
| Registry | Service managed or discovered through a registry |
| Online / Offline | Shows whether the service is currently available |
In simple terms, applications are like “software you can use directly”, while services are like “capability interfaces you can connect to the system”. If you want to extend system functions, start with the application area; if you want agents to connect to external capabilities, focus on the service area.
5. FAQ
| Question | What to Do |
|---|---|
| I cannot find the agent I want on the left | Use the search box first; if it still does not appear, open Agents in Resource Manager and check whether it has been created or enabled |
The command list does not appear after I type / | Make sure the cursor is inside the input box and type / again; if it still does not appear, try /help |
| I cannot find a skill after importing it | Go back to Skills in Resource Manager, check whether the import succeeded, and confirm that the skill is enabled |
| I do not know where to open an installed application | Return to the Applications area in Applications and Services, then check the application's Open, Start, or Manage entry |
| A service is shown as offline | Check the service configuration, network connection, API key, or MCP / HTTP service address |
| The agent's result is incomplete | Continue adding requirements in the same conversation, or describe the goal, files, and output format more clearly |