Plan Confirmation
When you assign a task, the agent won't start executing immediately—it will first create a plan and wait for your review and confirmation before proceeding.
Why Plan Confirmation is Needed
In reality, you wouldn't let a new colleague start working immediately either. Good practice is: first have them explain what they plan to do, and only let them proceed when you think it's okay.
The benefits are:
- Discover misunderstandings: The agent may have misunderstood your intent
- Fill gaps: The agent may have missed an important step
- Adjust strategy: You may have a better execution approach
- Set boundaries: Mark in advance which steps need your confirmation
When Does the Agent Automatically Make a Plan
The agent judges automatically when to make a plan first and when it can act directly. The criteria are:
| Task characteristic | Agent behavior |
|---|---|
| Modifying 3+ files, or anticipating 5+ tool calls | Plan first |
| Includes irreversible operations (delete files, publish a release, migrate data, send email to external parties, etc.) | Plan first |
| You explicitly say "make a plan first" / "think it through" / "list the steps" | Plan first |
| The agent itself is uncertain how to proceed | Plan first |
| Single-file small edits | Act directly |
| Pure queries / explanations / reads | Answer directly |
| You explicitly say "just do it" / "no plan needed" | Act directly |
This works like an experienced colleague—they don't run plans by you for small things, but always check before big or ambiguous ones.
See "Asking the Agent to Always Plan First" below—you can force the agent to plan for any task in this session, regardless of size.
What the Plan Contains
The plan created by the agent typically includes the following information:
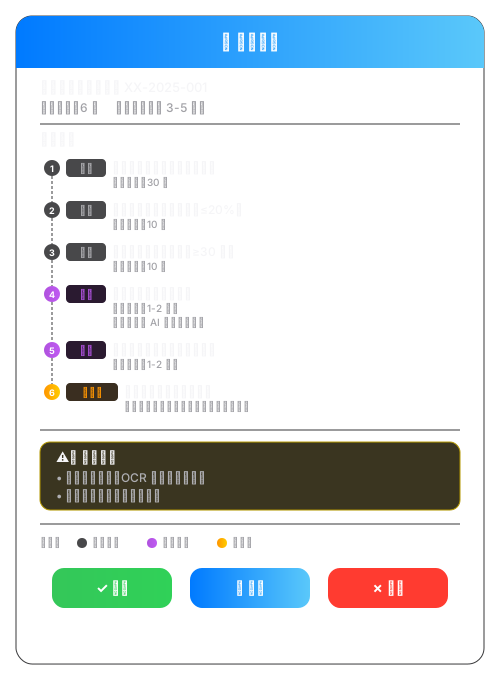
The full plan is a structured Markdown document, automatically saved at .desirecore/plans/<plan-id>/PLAN.md in the current working directory (e.g. .desirecore/plans/plan-review-contract/PLAN.md). Even if you close the conversation, the file stays there for later review or version control. Each plan revision creates an immutable historical version under the revisions/ subdirectory.
Plan File Structure
Each plan is a standard Markdown file using YAML frontmatter + body format:
---
schema: 1
id: plan-review-contract
title: Review procurement contract
revision: 1
parent_revision: null
created_at: 2026-07-27T10:00:00+08:00
updated_at: 2026-07-27T10:00:00+08:00
workdir: /path/to/workspace
plan_path: /path/to/workspace/.desirecore/plans/plan-review-contract/PLAN.md
scope: agent
related_workdirs: []
---

# Review procurement contract

## Goal
Review the attached procurement contract, identifying legal and commercial risks.

## Constraints
- Follow previously taught contract review rules
- Do not modify the original contract file

## Steps
1. Parse the contract PDF, extract clause text
2. Check each clause against taught rules (penalties, payment terms, etc.)
3. Adaptively analyze imported equipment clauses
4. Generate review report
5. Save draft and wait for confirmation

## Verification
- Report covers all taught rules
- No overlooked high-risk clauses
Required frontmatter fields:
| Field | Description |
|---|---|
schema | Always 1 |
id | Plan unique identifier (kebab-case) |
title | Plan title |
revision | Current version number (starting from 1) |
parent_revision | Previous version number (null for the first version) |
created_at | Creation time (ISO 8601) |
updated_at | Last update time |
workdir | Absolute path of the working directory |
plan_path | Absolute path of the plan file itself |
scope | Scope (agent or team) |
related_workdirs | List of related working directories |
The body is free-form Markdown, typically containing ## Goal, ## Constraints, ## Steps, ## Verification sections, organized flexibly according to the task.
Step Type Explanation
| Icon | Type | Meaning |
|---|---|---|
| ⚙️ | Deterministic Step | Steps with clear rules and certain results, executed like a program |
| 🧠 | Adaptive Step | Steps requiring AI understanding and judgment, results may vary by situation |
| 🚪 | Human Gate | Pause when executing to this step, waiting for your confirmation (steps marked confirm: yes in the plan) |
Each step carries a risk: low | med | high tag. High-risk steps are automatically set as "human gates" — this is the agent's discipline to avoid irreversible actions when you aren't watching.
Asking the Agent to Always Plan First
If you want the agent to plan every time (even for simple tasks), there are three ways to force Plan Mode on. Once enabled, every task in this session goes through "plan → approval → execute" until you turn it off, or until a plan is approved and auto-exits.
Method 1: Click the 📋 button
There is a 📋 Plan button on the right side of the chat header. Click it to toggle. When enabled, you'll see clear visual cues:
- The button is highlighted (purple background)
- The input box border turns purple
- The placeholder reads "Plan Mode is on: the agent will draft a plan before executing"
Method 2: Keyboard shortcut Shift + Tab
Press Shift + Tab on the main interface (when the cursor isn't in the input box). Equivalent to clicking the 📋 button. This matches Claude Code's habit.
Method 3: Slash command /plan
Type /plan in the input box and submit:
- Send
/planalone → enable Plan Mode without sending any message - Send
/plan refactor the user module→ enable Plan Mode + submit "refactor the user module" as the task
Pick whichever fits your habit. After the plan is approved (or rejected), forced mode auto-disables—you'll see a toast "✓ Plan approved, executing". No need to turn it off manually.
Forced Mode vs Auto-Judgment
| Scenario | Without forced mode (default) | With forced mode |
|---|---|---|
| You ask "1+1=?" | Direct answer: 2 | Still goes through the (very simple) plan flow |
| You say "add a comment to this line" | Single-file edit, act directly | Still plans first |
| You say "refactor the whole auth module" | Auto-triggers plan | Auto-triggers plan (same result) |
Forced mode is useful when:
- You're letting the agent change a critical system and want full control
- You just taught the agent new rules and want to confirm it actually internalized them
- You're about to delegate a series of tasks and want to see plans for each one
Otherwise, letting the agent decide on its own is more efficient.
How to Review the Plan
When reviewing the plan, focus on the following points:
1. Are Steps Complete?
See if any important steps are missing. For example, if you taught "imported equipment must have Chinese instruction manual clause checked," is this step included in the plan?
2. Are Step Types Reasonable?
- Steps with clear rules should be "deterministic"
- Steps requiring understanding and judgment should be "adaptive"
- High-risk operations should have "human gates"
3. Are Risk Warnings in Place?
The agent will proactively mark possible risks. If you think there are other risks, you can add them.
4. Human Gate Settings
Confirm which steps need your intermediate confirmation. Too many will affect efficiency, too few may pose risks.
5. Is the Critical Files List Reasonable?
The "Critical Files" section should match what you expect to be touched. If files you didn't intend to modify show up, raise it.
Three Approval Options
When the agent finishes the plan, it asks you a structured question with three choices:
| Option | Meaning |
|---|---|
| Approve and execute | Execute the current plan; forced mode auto-disables |
| Needs revision | You describe what to change; the agent rewrites the plan and asks again |
| Reject | Task terminated; forced mode auto-disables |
Modifying the Plan
If the plan needs adjustment, you can simply say:
You: "The plan is basically fine, but make two changes:
    1. Change step 4 to deterministic step—the rules for checking imported equipment clauses were already
       taught before, just check according to the rules
    2. Add a step between step 5 and step 6: save the report as a
       draft first, don't send it directly"
The agent will update the plan file and show it to you again for confirmation:
Agent: "Plan updated. Changes as follows:

        Step 4: 🧠 [Adaptive] → ⚙️ [Deterministic] Check imported equipment clauses according to existing rules
        New Step 6: ⚙️ [Deterministic] Save review report draft

        Plan file updated at .desirecore/plans/plan-review-contract/PLAN.md
        Confirm execution according to updated plan?"
Quick Confirmation
For simple tasks or tasks you're already familiar with, you can skip detailed review:
You: "The plan is fine, start directly."
Or for low-risk routine tasks, you can inform the agent in advance that plan confirmation isn't needed:
You: "Help me review this contract, no need to confirm the plan with me, just follow the previous process."
Even if you trust the agent, it's recommended to take a look at the plan when executing a new type of task for the first time. After confirming it truly understands your requirements, you can confidently skip it next time.
Where Plan Files Live
Each agent's plan files live in its own working directory under the .desirecore/plans/ subdirectory—this is intentional:
- Reviewable: Plans are plain Markdown files; you can open them in any editor and diff versions
- Auto-versioned: Each revision creates an immutable historical version (
revisions/); PLAN.md always holds the latest - Version-controllable: If the working directory is a git repo, plans become the team's "decision log"
- Tied to the project: Switch machines or check out a fresh copy of the repo to see all historical plans
Different agents cannot see each other's plans—switching to another agent shows you its own plan library, no confusion.
Add .desirecore/plans/ to .gitignore to keep them local only and out of version control.
After confirming the plan, the agent begins execution. Go to Execution Monitoring to see how the agent uses a task list to make every step's progress transparent to you.